I/0 board is also different. There's no socket for the AMD 9512 coprocessor.
There's no nickel-cadmium battery backup for the real time clock. The disk
drive controller is different. An extra chip on the 1/0 board replaces the
Lisa Lite Adapter which was formerly located in the drive cage. The disk
drive cabling is different. The wiring harness is different. The power supply
is different. One megabyte of RAM is standard. If you have Lisa OS disks,
a 10MB internal hard drive, no Lisa Lite card, no external parallel connector,
and a 1.8-A 110/220V power supply, yours is at least a Lisa 2/10.
Macintosh XL: The Macintosh XL is exactly the same as a Lisa 2/10.
Only the sticker on the box, the operating system, and the instruction manuals
are different. Instead of Lisa OS, the bundled OS is Macintosh System software
and MacWorks XL, a Lisa program which allows 64K Macintosh ROM emulation.
If you have MacWorks XL instead of Lisa OS disks, a 10MB internal hard drive,
no Lisa Lite card, and a 1.8-A power supply, yours is probably a Macintosh
XL.
Regardless of which model you own, all Lisa/XL's are easily repaired. The next two sections show how to get a dead Lisa going again. The section after that shows how to turn it into a super deluxe, big-screen Macintosh Plus.
Lisa/XL Disassembly Procedure
All Lisa/XL models are built on the same chassis and come apart the same
way, without tools. Before beginning, shut down the Lisa (if it's on) and
physically disconnect the power cord from the back of the computer. To remove
the front panel place your hands along the bottom edge, feel for the two
finger grips, and push up gently as shown in Figure 1. Pushing up disengages
two plastic tabs, swings the front panel forward, and opens a safety switch
in the lower left corner of the chassis. If the computer is on, removing
the front panel will immediately turn it off. Since this is not the recommended
way to power down, always remember to Save your work and Shut Down before
removing the panel.
The disk-drive assembly is held in place by a spring-loaded knurled nut
as shown in Figure 2. To remove the entire disk-drive cage, loosen the nut
until it springs free and then pull straight back. The cage slips out easily.
Normally, the wiring harness is just long enough to allow you to set the
assembly down in front of the computer. Take care not to snag or overextend
the drive cables. As shown in Figure 3, there's not much slack!
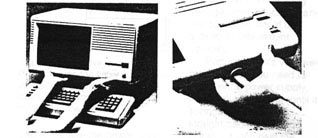
Figure 1 To remove the front panel,
feel for the finger grips at the bottom edge and push up gently.
Once the drive cage is out, note whether the floppy drive ribbon cable is
routed to a connector at the back of the cage or whether it's connected
to a Lisa Lite Adapter mounted in the lower left-rear portion of the drive
cage. A Lite Adapter indicates that the computer is a Lisa 2. Direct connection
suggests a Mac XL. You can remove the internal disk drive by tilting the
drive cage forward