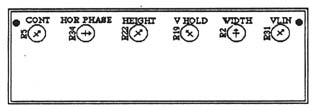
Figure 31 The CONT., HOR. PHASE, HEIGHT, V. HOLD, WIDTH, and V. LIN adjustments are at the top of the video board.
18. Adjust an accurate VOM meter to the lowest DC volt scale capable of measuring 5.0 V DC. Attach the black probe to the Lisa chassis. Locate the HOR. PHASE potentiometer, labeled R34, which is second from the left as you face the front of the video board. Turn around and face the rear of the video board. Find the point where R34 is soldered to the printed circuit. Insulate the red VOM probe with a piece of shrink tubing. Carefully touch the tip of the insulated, red probe to the rightmost of the potentiometer's three solder joints. (Note: if you do this while leaning over the front of the computer, the 5.0-V joint will be on your left.) Be careful not to short uninsulated probe tips to the steel card reading is out of range, go on to step 19. If it's in range, skip to step 21.
19. Refer to Figure 5. Turn off the Lisa/XL. Face the rear of the computer and unplug the power cord from the power supply. Unscrew the knurled knob and remove the supply by pulling straight back. New units may offer some resistance. Pull straight back.
20. As shown in Figure 32, find the access hole on the left side of the power supply. With a long-handled 1/8-inch slotted screwdriver, tweak the +5.00-V adjustment pot (RII) clockwise 1/16 of a turn. Reinsert the supply and measure again (repeating step 18). If the meter still doesn't read +5.00 volts, repeat steps 18 through 20 until it does.
21. The Macintosh XL Screen Kit generally causes horizontal foldover which manifests itself as an annoying 1/8-inch to 1/4inch white bar at the left edge of the screen. Turn the horizontal phasing control (at the top of the video board) counterclockwise until it's gone. Properly adjusted, the pointer on the HOR. PHASE pot will typically indicate eleven o'clock. If you can't adjust

Figure 32 The +5.00-V adjustment can be reached through this access hole on the left side of the power supply.
the HOR. PHASE pointer past twelve o'clock, check for excess sealant and remove it as noted in step 16. If the pointer turns fully counterclockwise and you still have a foldover problem, check the +5.00 voltage adjustment as noted in steps 18-20.
The next step requires accuracy and involves the use of a soft cloth ruler (also known as a dressmaker's ruler). Use a good one. Because the edge protectors on cheap rulers are only haphazardly cemented to the tape, the first and last inches could be off by as much as 118 inch! Attempting the final alignment procedure with an inaccurate ruler will prove futile. Choose a